Workflows
Plan work on a board
Every project has a board: its tasks as cards, in columns its managers choose. The team moves the cards as the work moves, and talks about each one on the card. The cards are the same tasks people book their hours to, so the board and the week never disagree. Tasks can also be brought in from Azure DevOps, Jira, Trello or Notion.
Who does what
Who can open a board, and what they can do on it, depends on how they stand on the project, not on the menu: everybody has Boards. A project's manager here is an administrator, or a Manager or Finance user whose grant gives them Manager access to the project (see Grants and project teams). A member is someone ticked on the project's team.
| On the board | The project's managers | A member with Can create tasks | Any other member |
|---|---|---|---|
| Open it | Yes | Yes | Yes |
| See the cards | Every card | The cards they can book time to | The cards they can book time to |
| Move cards | Yes | The cards they see | The cards they see |
| Add cards, rename and describe them | Yes | The cards they see | No |
| Comment on a card | Yes | The cards they see | The cards they see |
| Set dates, estimate, owner and who sees a task; delete it | Yes, on the project's page | No | No |
| Add, rename, recategorize, reorder and delete columns | Yes | No | No |
| Link the project to a source and import tasks | On the Team plan and up, and during the trial | No | No |
Managing a board takes the role as well as the grant: a User who has been given Manager access to a project is still a member on its board. Adding a connection to another tool, which every project can then import from, is for administrators alone. An administrator turns on Can create tasks on a person's page under Settings → People (Permissions for one person). Client guests do not see boards.
1. Open a project's board
- Choose Boards in the menu, under Collaborate. The page lists, by client, the projects you are on and, if you are a manager or an administrator, the active projects you manage.
- Choose the project. Its board opens with a column for each stage and a card for each task you can see. A manager can also open it with Board on the project's page.
Above the columns, Discussion opens the project's own conversation in Messages, and the project's managers have Project details and Import tasks. If the list says You aren't on any projects yet. A project's board appears here once you are added to it., ask whoever runs the project to put you on its team. Boards describes each part of the screen.
2. Set up the columns
A new project's board has four columns: Not started, In progress, Blocked and Done. A copied project keeps the columns of the one it was copied from. You can name the columns anything and have as many as you like, but each has a category, one of those four, and a card's status is always its column's category. A card in a column whose category is Done counts as done on timesheets and in every count of open tasks.
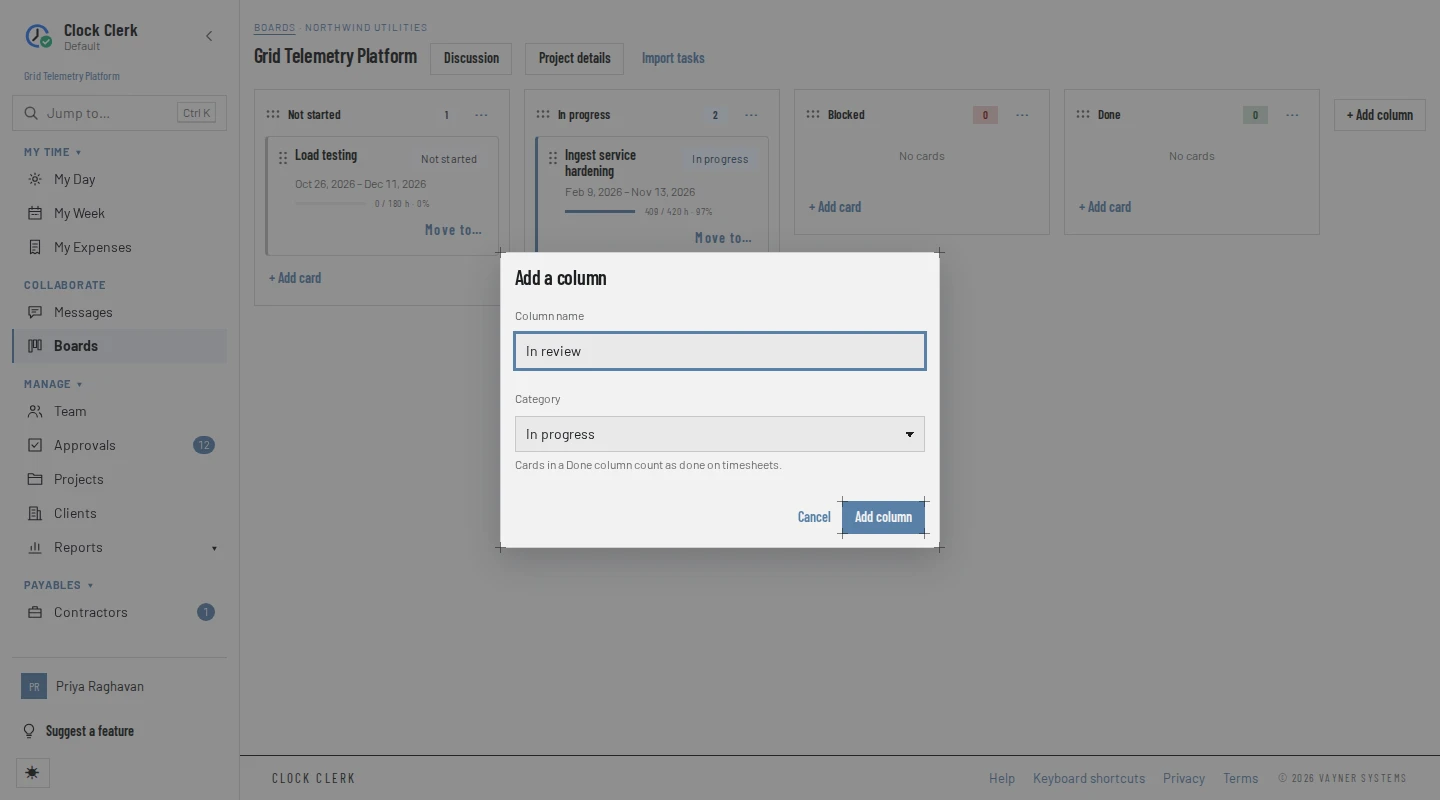
- To add one, choose + Add column at the end of the row. In Add a column, type the Column name, pick its Category, and choose Add column. It is added at the right-hand end.
- To change one, open the ⋯ menu in its head: Rename…, Change category… (every card in it takes the new category as its status), Move left or Move right. You can also drag a column by the dotted handle in its head.
- To delete one, choose Delete… in its menu. If it has cards, pick where they go under Move the cards to; they land at the bottom of that column and take its category. Then choose Delete column.
A column name can be up to 60 characters and has to be unique on the board, ignoring capitals. A board always keeps at least one column, and at least one Done column.
3. Add cards
A card is a task. Either way of adding one makes the same task:
- On the board: choose + Add card under a column, type the Card name and choose Add. The card goes to the bottom of that column, and the box stays open for the next one. A card added this way is seen by every member, with no dates, estimate or owner yet.
- On the project's page: a manager chooses New task, where the dates, Estimated hours, Owner, Description, Status and Task visibility are set at once. The card goes to the bottom of the first column of the status chosen. See Projects.
Only the project's managers, and members an administrator has let create tasks, have + Add card. Others can ask a manager, or suggest the task in the card's or the project's discussion.
4. Open a card and talk about it
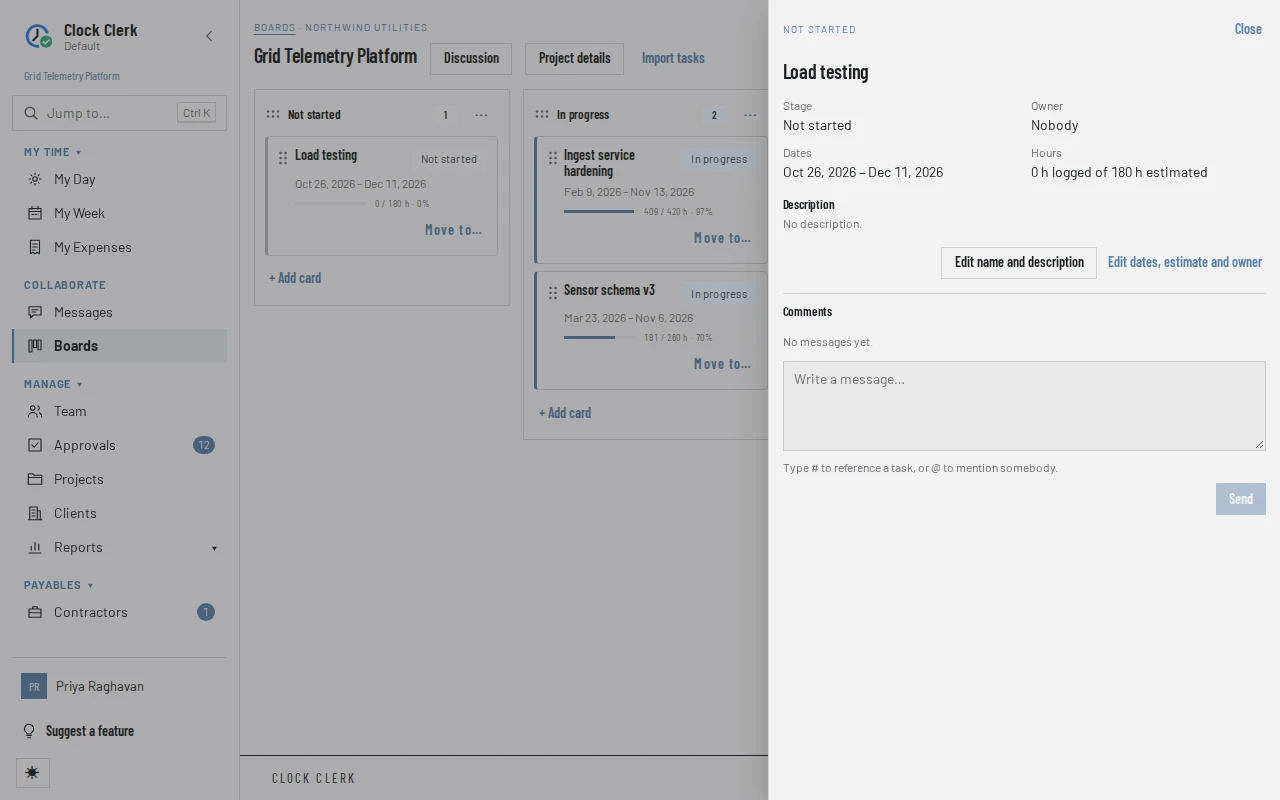
Choose a card's name. Its panel opens down the right, with the board still in view. It shows the card's Stage, Owner, Dates and Hours logged against the estimate, and its Description. Then:
- Edit name and description changes the two, for the project's managers and members who can create tasks. Choose Save.
- Edit dates, estimate and owner opens the task's own form on the project's page, for the project's managers. That is also where a task's visibility is set, and where it is deleted.
- Comments is the card's conversation. Anybody who can see the card can read it and write in it: type and choose Send. Type # to reference another task, or @ to mention somebody. Each person can edit their own messages and nobody else's; the project's managers can also remove someone else's. Talk with your team and clients covers conversations in full.
- Discussed in, when it appears, lists the other conversations that reference this card.
Close, or Esc, closes the panel. A card that has a conversation says how many comments it has on its face.
5. Move cards as the work moves
- Drag the card by the dotted handle on its left into another column, or to another place in its own column.
- Or, from the keyboard, open the card's Move to… menu and choose Top or Bottom under the column it goes to.
The card moves at once and takes the new column's category as its status: dropped into a Done column, the task is done. Moving a card changes nothing else about it, and it is never blocked by hours being submitted, approved or invoiced, because it changes no hours. If someone else changed the board at the same moment and the move cannot be made, the card goes back to where it was and the board is read again.
From the board to the week
A card is a task, so there is nothing to copy across:
- A member sees the same tasks on the board as in Add line on their week: the project's tasks open to all its members, and the restricted ones they have been selected for. To book time to a task they also need a billing role on the project (Set up your organization).
- A task in a Done column is marked Done on the week. Time can still be booked to it.
- The hours people book show on the card, as … h logged, or as a bar against the task's estimate.
Renaming a card renames the task on the board, in the lines already on people's weeks and in reports. An invoice already drawn up keeps the name the task had when it was made, so a customer is never sent a changed copy. Record and submit your week covers booking the time.
6. Connect a source (administrators)
Importing tasks is on the Team and Enterprise plans and during the trial. On Free and Starter, Integrations is not in the menu and the board has no Import tasks; see Plans and your trial. An administrator connects each tool once, and the project's managers import from it.
- Choose Settings → Integrations, then New connection.
- Pick the Source, and give the connection a Name: it is what managers see when they choose where to import from.
- Fill in what the source asks for (below). The help under each field says where to find it in that tool.
- Choose Add connection. The app says … added. Test it to check the address and key.
- Choose Test connection on its row. A test that works says whom the key reaches, such as Connected as …; one that fails says why.
| Source | What the form asks for | What a project links to |
|---|---|---|
| Azure DevOps Services | Organization URL (https://dev.azure.com/your-organization, without a project), and a Personal access token with the Work Items (Read) scope. Where your deployment offers it, Authentication can be Sign in with Microsoft instead of a token. | A team of a project, or a shared query that returns a flat list. |
| Azure DevOps Server (TFS) | Collection URL, reachable from the internet over https with a publicly trusted certificate; a Personal access token with Work Items (Read); and, optionally, the API version. Azure DevOps Server 2019 and later. | A team of a project, or a shared query. |
| Jira Cloud | Site URL (https://your-site.atlassian.net), the Account email the token belongs to, an API token, and, optionally, the Start date field. | A project, or a project narrowed by one of the token owner's starred filters. |
| Jira Data Center | Base URL, https and reachable from the internet; a Personal access token (Jira 8.14 and later); and, optionally, the Start date field. | A project, or a project narrowed by a starred filter. |
| Trello | An API key and a Token, from a Power-Up you create in Trello. Whoever allows the token has to be a member of the boards you import from. | A board. |
| Notion | An Internal integration secret. Then share each database you import from with the integration, in Notion. | A database. |
The account behind the key needs to see what your projects import, and nothing is ever written back to the source. Keys are stored encrypted and never shown again. Integrations covers editing, turning off and deleting connections.
7. Link the project to a source
The project's manager links it once, to one board or project in one source.
- On the project's board, or its page, choose Import tasks. The first time, it opens Link a source.
- Under 1. Connection, pick one of the connections your administrator added. If there are none, the dialog says No sources are set up. Ask an administrator to add one under Admin → Integrations.
- Under 2. Board or project, type to search, and pick what this project's tasks come from.
- Under 3. Mapping, check what it suggests:
- Columns: for each column or state in the source, the column of this board its items land in, or Skip. Items in a skipped column are not offered for import.
- People: for each person in the source, the project member who owns the tasks made from their items, or No owner. People are matched by email where the source shares one; Trello almost never does, so map them by hand. Only members of the project's team can own a task.
- Fields (Notion): which property of the database is the column, owner, start date, end date and estimate.
- Default filter (optional): what the list of items opens with, such as one state or one sprint.
- Choose Save link. The app says Saved the import link. and opens the list of items to import.
A project links to one place at a time. Two projects can link to the same board in a source.
8. Pick what to import
Once the project is linked, Import tasks opens the list of the source's items. Its header names the source and the board, with Change link and Unlink, and when the last import was made.
- On Available, narrow the list with the filters the source offers (state, type, sprint, label, assignee, changed since, text…). Show more reads the next page.
- Tick the items you want, or Tick all shown. Each one shows its column and assignee in the source, its estimate, and Open in source. An item already imported into another project is marked Also in …, and can still be imported here.
- A ticked item opens its Column, Owner and Estimate (h), as the mapping set them. Change them for this item if you like. Ticks are kept when you change the filter, so one import can gather items from several filters.
- Choose Import … tasks. The app says Imported … tasks onto the board., and lists anything it skipped and why, and any warnings, such as No member of this project matches …, so the task has no owner.
Items that should never become tasks can be ticked and marked with Mark … as not for timesheets instead, so they stop being offered. Show dismissed lists them again, each with Restore. Up to 200 items can be imported or marked at a time. The Imported tab lists what has been imported, each linked to its card.
Each imported item becomes a task, named after its title (up to 200 characters), with its start and due dates and its estimate where the source has them, and the owner the mapping or your choice gave it. It is open to every member of the project, and lands at the bottom of its column, in the order the list showed, with the column's category as its status. The description, comments, attachments and history stay in the source.
Importing again, and changes at the source
Run Import tasks as often as new work arrives in the source. An import copies the item as it is at that moment, and never updates it later:
- An item already imported is not offered again, by anyone, into the same project. Changing it in the source, renaming it, moving it or closing it, changes nothing in Clock Clerk; change the task here too if it matters.
- An item deleted or moved away in the source leaves its task here as it is, hours and all. If it goes before it is imported, it is no longer listed, and an import that still asks for it skips it with The source no longer has it on the linked board.
- A task deleted in Clock Clerk makes its item available to import again. A task with time booked to it cannot be deleted.
- Unlinking leaves every imported task on the board. Linking the same board again remembers what was imported and what was marked not for timesheets, so nothing comes in twice.
- Changing the link to another board is possible only until something has been imported through it. After that, unlink and link again.
- A connection turned off by an administrator stops imports, but keeps every link. Imported tasks never depend on the connection.
When Boards is turned off
An administrator can turn Boards off for the whole organization, when it only tracks time. While they are off:
- Boards is gone from the menu, from Jump to and from Home, and a project's page has no Board. Opening /boards or a board's address takes you to Home.
- Nobody can open a board, move or add a card, or change the columns. Trying anyway is refused with An administrator has turned Boards off for this organization. Everything already in it is kept, and comes back when it is turned on again.
- A card's conversation is still listed and read on Messages, but takes no new messages and no edits. On Messages a task referenced in a message is its name, with no link.
- The tasks carry on. Everybody still books time to them, and their managers still add, edit and delete them on the project's page. Import tasks still works there, and each item still lands in the column its mapping says. Its Imported list, and an item's Also in …, name the tasks and projects without a link to their board.
Nothing is deleted. When Boards is turned on again, every card is in the column and place it was in, a task added meanwhile is at the bottom of the first column of its status, and every comment is back.
When something goes wrong
- Adding and editing tasks on this board needs an administrator's permission. You are a member without Can create tasks. Ask an administrator, or a manager of the project.
- A card you expected is missing. The task is restricted to selected people, and you are not one of them. Its manager can add you under Task visibility.
- This board already has a column with that name. Names are unique on a board, ignoring capitals. Choose another.
- A board needs at least one Done column, so this one cannot be deleted. or … so this one has to stay Done. Add another Done column first. Likewise A board needs at least one column, so its last one cannot be deleted.
- This project's board has no column for that status. A task's Status was set on the project's page to one no column of the board has. Add a column of that category, or choose another status.
- This connection needs attention. Ask an administrator. The connection is turned off, or has to be signed in again. An administrator opens Settings → Integrations and turns it on, reconnects it, or enters a new key.
- The last test of this connection failed. If importing doesn't work, ask an administrator. The connection can still be tried. If the list of boards or items then says why it failed, such as The source couldn't be reached. Check the URL: it has to be an https address that is reachable from the internet., an administrator corrects the connection and tests it again.
- The source refused the key. Check that it is right and has not expired. or The source accepted the key, but it does not have the access this needs. Check its scopes. An administrator replaces the key on the connection.
- The source has more items than one query can read. Narrow the filter. Pick a state, a sprint or a date under the filters.
- Tasks have already been imported through this link, so it stays on the board it was made for. Unlink it and link again to import from somewhere else. See Importing again.
- Somebody else linked this project just now. Reload to see their link. Another manager saved a link at the same time. The dialog opens again on theirs.
- Mapping needs attention: the Notion property the link reads the … from is no longer in the database. Open the link and choose another. Choose Change link and pick another property under Fields.
- Projects import through this connection: … Unlink them first, or disable the connection instead. A connection cannot be deleted while projects link to it.
- No Boards in the menu, and no Board on a project's page. An administrator has turned Boards off for your organization (above).
- No Import tasks button. You do not manage the project, your plan does not include integrations, or you are on the live demo, where connections are switched off.