Workflows
Set up your organization
From an empty trial to a team that can record time: create the organization, decide how people sign in, add them, then add a client and a project, put people on its team and say who oversees it. The rest, holidays, expense categories, branding and your plan, can follow at any time.
Who does this
An administrator. The first one is whoever creates the organization: the person who signs up with their work email, or the Microsoft Entra administrator who grants consent. Everything under Settings in the menu is theirs alone, and so are people's roles and grants.
Two parts can be shared once others are in. Finance keeps the billing rates and team costs. A Manager adds projects to a client they were granted and runs those projects' tasks and teams; adding, editing and archiving the client itself stays with administrators.
1. Create the organization
How you start decides how your people will sign in. Read step 3 first if your company already uses Microsoft 365 or Okta.
With a work email
- Choose Start free trial on this site. Type your Work email and Full name, and choose Create workspace. A personal webmail address is refused with Use your work email.
- Open the email Clock Clerk sends. Its link works once, for 24 hours. Asking again replaces it, so only the newest email's link works.
- Choose a Password (at least 8 characters, with a number and a special character), type it again under Confirm password, and choose Create workspace.
The organization is created, named after your email's domain, and its trial starts. You are its administrator, signed in, and taken to the setup steps. Its people sign in with email and password. If someone at your domain has already started one, the link says Your organization is already here, and Ask to join asks its administrator to add you.
Start on Free on the same form starts on the Free plan instead: no trial and no end date, for up to 3 people, 10 active projects and 20 clients. Free signs in with passwords only; to sign in with Microsoft, Okta or Google Workspace, start a trial, and keep it with any paid plan.
The buttons on the pricing page's Starter and Team cards open the same trial form. Every trial runs on the Team plan; from Starter's button the form says so, and you choose Starter on the Plans page during the trial or when it ends.
With Microsoft
- Choose Start free trial, tick I agree to the Terms and acknowledge the Privacy notice, and choose Continue with Microsoft.
- Sign in with your work or school account, and agree to share your name and email with Clock Clerk. You don't need to be an administrator in your Microsoft directory.
You come back signed in as the first administrator of a new organization for your directory, and the trial starts. Colleagues from your directory join as Users the first time they sign in with Microsoft. There is no setup wizard on this path; go on to step 4.
If your organization lets only administrators approve new apps, Microsoft says the app needs admin approval, and you come back to Sign in. Then:
- Ask a Microsoft Entra administrator of your directory to start the trial the same way. Microsoft lets an administrator approve Clock Clerk, and they become the organization's first administrator.
- Or have them grant admin consent for the whole directory, which gives your organization full Microsoft Entra ID sign-in (see Admin consent).
Signing in with Continue with Microsoft Entra ID before anyone has set your directory up does not create an organization: the page says no organization signs in with your account yet, and offers Start a free trial for your organization.
Whoever started the trial or granted consent is the first administrator. From then on everyone in your directory can sign in with their work account, and arrives as a User. Or sign up with a work email instead. Signing up and setting up shows each of these screens.
2. Name it
After signing up with an email, the setup wizard opens on Name the workspace. Type your Organization name, which is required. The name can be changed later on Settings → Organization.
Choose Continue, which saves it. This is the only step that cannot be skipped. The wizard does not ask who will set up clients and projects: the getting-started checklist is one list for the whole organization, and it ticks each step off for whoever does it.
The wizard's second step, What will you use?, asks which of Expenses, Boards and Messages your organization will use. Time tracking is always on. Each starts on; clear the ones you won't use and choose Continue, and they leave everybody's sidebar, including for the people you invite next, which is why it comes before inviting. Nothing is deleted, and Skip for now leaves all three on. Beside them, during the trial, What your trial includes lists the paid features the trial lends you, each under the least plan that keeps it (Starter, Team or Enterprise), so you know what the plan you pick at the end comes with. Threads shared with clients say Paid plans · not during the trial. You can change the three any time on Settings → Features; Plans and your trial compares the plans.
The wizard's third step, Do you track kinds of work?, asks whether each time entry should name an activity: the kind of work, such as design or code review. Turn activities on if you bill kinds of work at different rates or want reports split by them; most teams leave them off, and then people just pick a task and enter hours. Activities start off, with every hour booked on one activity called Project work; while the box stays clear you can rename it under Name of your one activity, and reports and invoices that group by activity print that name. Ticking Ask for an activity on each time entry and choosing Continue turns them on, and you add the activities people choose from under Settings → Activities. Skip for now leaves them off and the name as it was. It comes before inviting for the same reason as features: it decides what the people you invite find on their week.
The wizard's fourth step, Who else keeps time?, invites people by name, email and role. It is the same as step 4, and Skip for now leaves it for the People screen. Each new row starts as User; choose Manager, Finance or Admin for anyone who should do more. Finance keeps the rates, costs and invoices; whether they may also countersign a contractor's month is set on the People screen. A Manager can only build projects under the clients you give them, so anyone who should also create clients needs to be an Admin. Everything after the first step can be skipped, and the checklist keeps track of what is left.
The getting-started checklist
A Getting started checklist runs down the right side of every screen for administrators, Finance and Managers: the steps from an empty organization to its first line on a timesheet. It is there in every organization, during the trial and after it. Users do not see it, and nobody does in the live demo or while the organization is read-only. It never appears beside the setup wizard or the Pick a look screen: the wizard sets the organization up, and the checklist takes over once you leave it.
It is one list for the organization, with six steps in the order the Add line picker needs them:
- Create your first client, on Clients.
- Add a project for that client, from the client's own page, so the project is filed under it.
- Add a task to the project, on the project's page.
- Set up a billing role, on Billing rates, with the rate it bills at.
- Assign billing roles, on the project's Team card: put people on the project's team and choose the roles they book as. In an organization with one billing role, ticking someone onto the team gives them that role, so the tick is the whole step.
- Add your first line to the timesheet, on My Week.
The steps follow what is actually there, never what was pressed: a client someone else added ticks the first step as surely as one you made, and the last step is ticked by anyone's first line on a timesheet, so an administrator who never records time can still finish the list. The open step's button, such as Go to Clients, takes you to the screen where the thing is made, and the button to press there is ringed, with a note under it. Once it is saved the step ticks itself off and the next one opens. On the Team card, the ring is on the first member who has no role yet, or on Add people while there is nobody to give one to.
What differs from one reader to the next is how far they can reach and which buttons they get:
- An administrator's steps count the whole organization, and every step has a button.
- A Manager's or Finance user's steps count only the clients and projects they can reach, so the list never names one they could not otherwise see. The first step is A client to work in. Only an administrator creates a client, so until one is granted to them it says Waiting on an administrator to give you a client, with no button, even if the organization has other clients. A Manager or Finance user who has no client but is on a project's team, ticked in the Timesheet column on their page under People, doesn't see the checklist at all: they were put there to log time, not to set the organization up. Granting them a client, as in step 9, brings the checklist back.
- For a Manager, Set up a billing role says Waiting on Finance or an administrator, since billing roles are kept on Billing rates. Finance sets one up as an administrator would. A billing role anyone sets up ticks that step for everyone.
Under the six, an administrator sees Also worth doing: Invite your team, on People, ticked once anyone else has been added, whatever their role; Choose how people sign in, on the Sign-in card of the Organization tab, ticked once your organization has moved off email and password or connected its directory; and, once there are Managers or Finance users, Every manager has a client, on People, ticked once each of them has been granted at least one client, as in step 9. They are not part of the count, and the checklist finishes without them. Managers and Finance are not offered them.
When all six are done it says First line on the timesheet. For an administrator who has invited people, that comes with a reminder to put them on a project's team so they can log too; if nobody else has been invited yet, it offers only Close checklist, since Invite your team is already under Also worth doing. For a Manager or Finance user, it comes with a reminder to add your team to the project so they can log too.
Putting it away
The – button minimizes the checklist to a small tab in the corner with the count; choose the tab to open it again. Hide takes it off every screen but My Week, where it stays as a strip across the top with Open checklist. Once every step is done, Close checklist puts it away for good. How you left it is remembered in this browser, for you alone. Someone whose steps are all done the first time the checklist reads them never sees it, so an organization that is already under way mostly never does. A Manager who joins before anyone has granted them a client, and isn't on any project's team, still does, until there is a client, project, team and timesheet line within their reach.
3. Decide how people sign in
Every way but email and password is single sign-on, which comes with the Starter, Team and Enterprise plans and the trial, not with Free. An organization on Free moves to a paid plan before it switches to a provider, and one that signs in through a provider switches back to passwords before it can move to Free.
| Sign-in | How it is set up | Admin consent | Directory setup guide |
|---|---|---|---|
| Email and password | Signing up with a work email. | Not needed. | Not needed. |
| Microsoft Entra ID | Signing in with Microsoft and granting consent, or moving over later. | Needed once, by a Microsoft Entra administrator, before anyone can sign in. | Only to find people by name when adding them. Without it, add them by hand, or let them sign in. |
| Okta | Choosing your organization's Okta at the sign-up link, or switching to it later with a test sign-in (Set up single sign-on). Otherwise your IT administrator creates the Okta app from the setup pack Clock Clerk sends and sends back two values, and Clock Clerk's support then makes the switch. | Not needed. | Not needed. |
| Google Workspace | Your Google Workspace administrator creates one OAuth client in Google Cloud console, as below. An administrator then switches to it themselves with a test sign-in, from the Organization tab or the setup wizard. No request to support, and no domain to type. | Not needed. | Not needed. |
An organization that signed up with an email can ask to move to Microsoft on the wizard's last step, How people sign in: choose the card, give your IT administrator's address under Send the setup pack to, and choose Finish setup. It is a request: your IT administrator is emailed the steps, support makes the switch, and until then everyone keeps signing in with a password. Later, the Sign-in card on Organization does the same, with Connect Microsoft Entra ID or Email your IT administrator.
Okta, Google Workspace or another OpenID Connect provider, an administrator can switch to themselves, on the same step's Okta or Google Workspace card or with Set up single sign-on on the Sign-in card. Register Clock Clerk at your provider with the redirect URI shown, enter its details, and choose Test sign-in. To pass, your provider has to sign in one of your organization's administrators, with their Clock Clerk address on your organization's own domain. A test changes nothing; once one passes, Switch on moves the organization over: passwords stop working, everybody signs in through the provider at your workspace address, and anyone whose address there is not the one they have in Clock Clerk is refused as not invited until the two match. An organization that switched itself can switch back to passwords. Where the switch to Okta is not available to you, or you would rather your IT administrator did it, Send the setup pack asks support instead. Set up single sign-on has the details.
If Clock Clerk's app integration in your Okta has only the /login sign-in redirect URI, there is one thing to add: your Okta administrator adds the sign-in redirect URI https://workspace/api/auth/oidc/callback to Clock Clerk's app integration, beside the /login one it already has. Until then, sign-ins stop at Okta's redirect_uri error. See Signing in.
Signing in with Google Workspace
Your people sign in with the Google accounts of your organization's Google Workspace. An administrator switches your organization to it themselves, after a test sign-in, with no request to support. It takes an organization that signs in with email and password, and an administrator whose Clock Clerk address is on one of your organization's own domains, the one it signed up with or another it has proved it owns, with an account at that address in your Workspace.
First your Google Workspace administrator, or anybody who can create a project in your Google Cloud, sets up Clock Clerk's app once, in Google Cloud console (console.cloud.google.com):
- Pick or create a project for Clock Clerk. Under Google Auth Platform (OAuth consent screen in older consoles), set the audience to Internal, so only your Workspace's accounts can use the app, and name it Clock Clerk. It needs no scopes beyond the standard
openid,emailandprofile. - Under Clients (Credentials in older consoles), create an OAuth client ID of type Web application. Add one Authorized redirect URI: the Redirect URI to register that Clock Clerk shows in step 4 below, such as
https://acme.clockclerk.com/api/auth/oidc/callback, exactly as written. - Keep the client's Client ID and Client secret for the administrator who makes the switch. If that is somebody else, give them the secret the way your company shares passwords, not in plain email.
Then an administrator makes the switch in Clock Clerk:
- Open the Organization tab and choose Set up single sign-on on the Sign-in card, then choose Google Workspace under Identity provider. Or, in the setup wizard's last step, How people sign in, choose the Google Workspace card. The panel shows the Redirect URI to register for step 2, and lists the administrators whose addresses everybody's first sign-in is matched on.
- Enter the Client ID and the Client secret. There is no issuer and no domain to type.
- Choose Test sign-in and, at Google, sign in with your own work account in your Workspace. You come back to the Organization tab. A pass says The test passed: Google signed in … of the Google Workspace at …, naming the Workspace's domain, which Google takes from the account.
- Choose Switch on within the hour. Everybody is signed out, passwords stop working, and you are taken to your workspace address to sign in through Google.
The Workspace is the one your test account belongs to, so it has to be on one of your organization's own domains. A personal Gmail account belongs to no Workspace and is refused, and so is an account of a Workspace on a domain your organization has not proved it owns. See When something goes wrong.
From then on, the Sign-in card's Method says Google Workspace, with the Google Workspace domain beneath it, and everybody signs in with Continue to accounts.google.com and their work Google account. Clock Clerk accepts only accounts that Google says belong to that Workspace, so a personal Gmail account, or one from another Workspace, is refused even if it could reach your Google app. A first sign-in is matched to the person an administrator added by the address Google has verified, so add people with their Google Workspace address. Nobody is emailed an invitation. An organization that switched itself can switch back to passwords from the same card; Set up single sign-on has the details.
In a Microsoft organization, the Sign-in card says whether people can be found by name. If they cannot, it shows the directory setup guide: the steps a tenant administrator takes to allow the search, with Copy these instructions and Email these steps. The email only goes to your organization's own domain, so for an IT administrator at another company, choose Copy a link for your IT administrator and send the link from your own email or chat: for a week, it shows them the same steps without signing in, and copying a new link replaces it. Choose Check again once they are done.
4. Add your people
Choose Settings → People, then New person. What the dialog asks depends on how you sign in:
- Email and password, in Add somebody: First name, Last name and Email, which is required and must be nobody else's here.
- Microsoft, in Add somebody from the directory: type at least two letters under Search the directory and pick the person. Someone already added says Already in Clock Clerk. Where the search is not set up, Add by hand asks for their name and Microsoft Entra object id instead.
- Okta: name and email, as for passwords. Nobody is emailed; they sign in with Okta once added.
- Google Workspace or another provider: name and email, the address they have there. Nobody is emailed; they sign in through it once added.
Then, in the same dialog, their Job title, the day they Starts, their System-wide role and, if they may, Can reopen a submitted week. Leave Email them the sign-in link now (Microsoft) or Email them a welcome with a link to choose their password ticked, add a note if you like, and choose Add person.
The app says Added and emailed. Set where their role applies below. and opens their page. The email comes from you through Clock Clerk, with your note:
- In a password organization, its link lets them choose a password and opens their week. It works once, for 7 days. A new one, emailed with Resend invitation or made with New link on their page, retires the old one.
- In a Microsoft organization, its link signs them in with their work account. It does not expire.
Until they sign in, they are marked Awaiting first sign-in on the list. During the trial, invitations are only emailed to addresses at your own domain: in a password organization the one you signed up with, in a Microsoft organization the domain of the inviting administrator's own sign-in name; anyone else is added but not emailed, and you send them the link from Copy invitation. Where your deployment cannot send email, Copy invitation is the only way. In a Microsoft organization you can also skip this step for most people: anyone in your directory who signs in is added as a User on the spot, and you set their role afterwards.
On the Free plan, an organization holds 3 people. People describes the list, the dialog and a person's page.
5. Set their roles and dates
Each person's page, from Open on the People list, has:
- Role: User, Manager, Finance or Admin, as Roles explains. It takes effect at once. You cannot give up your own Admin role; another administrator has to.
- Permissions: Can reopen a submitted week, Can create tasks, and, on plans with a holiday schedule, Paid holidays, which is on for employees.
- Time here: Started and Left. Nobody is asked for weeks outside them. There is no deactivate: when someone leaves, set the date they left.
A Manager reaches nothing until the steps below give them projects to oversee. A Finance user reviews everybody's time and sees every client and project without a grant, but needs one to change a project, its tasks or its team.
6. Add a client
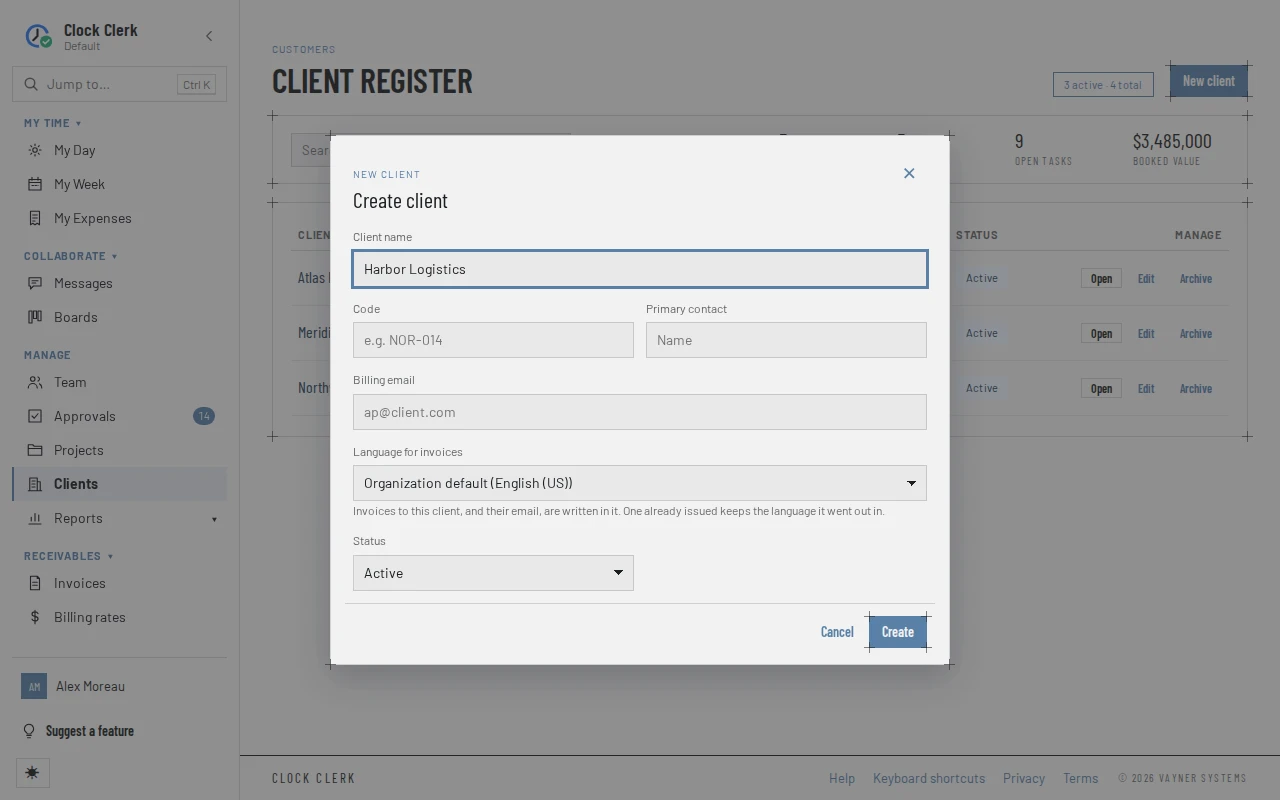
- Choose Clients in the menu, then New client.
- Type the Client name. Code, Primary contact, Billing email and Language for invoices are optional and used on invoices.
- Choose Create. The app says Client created.
Only administrators add, edit, archive and restore clients. A client cannot be deleted; Archive hides it, and its projects are no longer offered when people add a line to their week. On the Free plan, an organization holds 20 active clients. See Clients.
7. Add a project and its tasks
- Open the client and choose New project, or choose New project on Projects and pick the client.
- Type the Project name, and optionally a Code, Start date, End date and Cost estimate (USD).
- Choose the Billing type: Time and materials, Fixed or Non-billable; and the Status: Planning, Active, On hold or Complete. Time can be booked in any status.
- An administrator can tick who is on the team here, under Who can see this project. Otherwise it is done in step 8.
- Choose Create. The app says Project created. From the Projects register it opens the project; from a client's page the dialog closes and the new project appears in that client's Projects table, where you open it.
- Hours are booked to a project's tasks, and a new project has none. Choose New task, type its Task name, and choose who sees it under Task visibility: All project members, or Selected users.
To start the next project from this one, Copy project brings along its tasks, team and billing roles, and never its time. Tasks can also be imported from another tool on the Team plan and during the trial; Plan work on a board covers boards and imports. On the Free plan, an organization holds 10 projects that are not Complete. See Projects.
8. Put people on the project's team
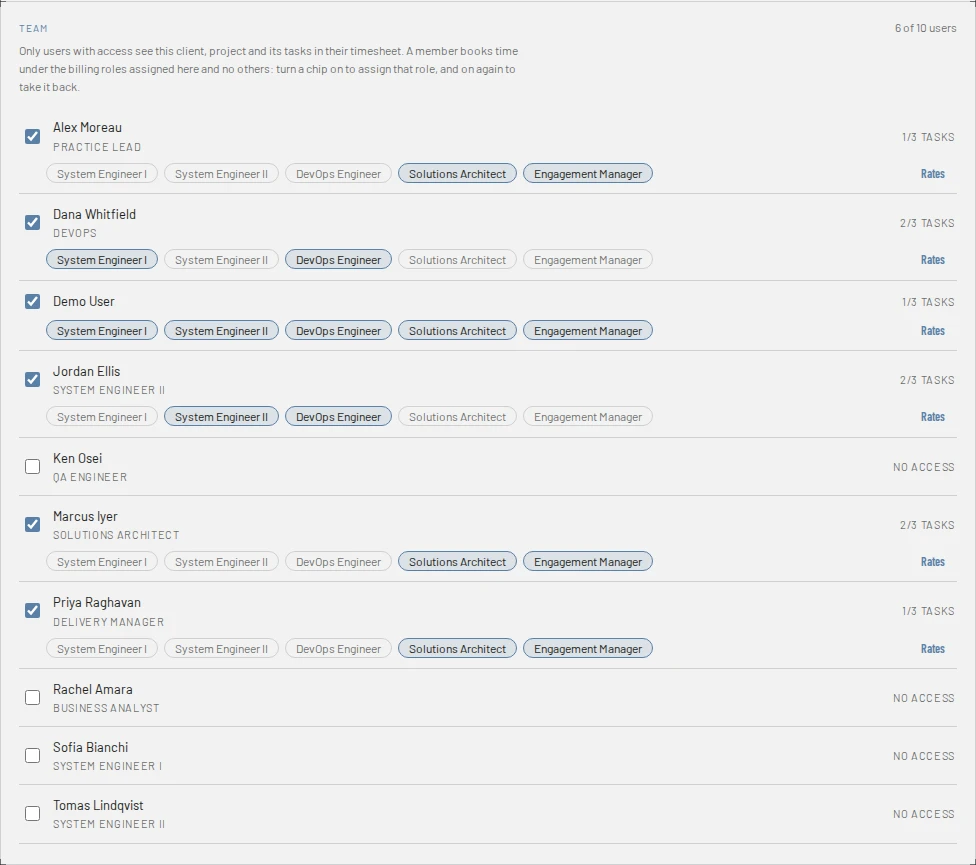
- On the project's page, under Team, open Add people and tick each person who works on it; its filter finds someone by name or job title. Each one you tick moves up into the team's list, and the project now appears on their week. On a new project with nobody on its team, Add people is already open.
- Under each person, make sure the billing role, or roles, they work as are turned on. Someone you tick starts with their own default role, or with your organization's only billing role if it has just one; turn on any others they work as by pressing their dashed + chips, and press a filled, ticked chip to withdraw that role. Until one is on, their row asks Choose a role so name can book time here, and the card's heading counts them, such as · 1 can't book time.
The billing roles themselves are a list kept under Billing rates (New billing role); a new organization starts with none, so create one there before assigning it. The same tick is on a person's page as Timesheet, beside each project. Being on a team is what lets someone log hours to a project; it gives them nothing to oversee.
9. Say who oversees what
Whose weeks a Manager approves, and which clients and projects they see under Projects and Clients, comes from their grants. Finance reviews everyone and sees every client and project without one, but needs grants to change the projects; administrators need none.
- Open the manager's page under Settings → People.
- Beside the client, set Client access to Manager. The app says … set to Manager. Every project of that client is now theirs to oversee.
- To hold back one project, or to give them just one project of a client, set that project's Project access to No access or Manager. Resolves to shows the result. Inherited puts it back to the client's level.
The manager now sees the client and its projects, and the weeks of the people on those projects' teams arrive in their Approvals. A grant only reaches as far as the role: a User oversees nothing, whatever they are granted. Grants and project teams explains the rule in full, and Review and approve time what a manager does with it.
10. Rates and costs
Hours are worth what the billing rates say, and approving a week is blocked while a billable line has no rate. An administrator or a Finance user sets them under Billing rates: standard rates per billing role, a client's contract rates, and a project's or one person's own, on the project's page. Team costs, what each person costs you, is on the Team plan. Bill a client covers how a rate is chosen, and Billing rates and team costs both screens.
Features you don't use
If your organization only tracks time, Settings → Features turns Expenses, Boards or Messages off for everybody, so the menu shows only what you use. Nothing is deleted, and ticking the box again brings the feature back as it was. See Features.
Holidays
On every paid plan and during the trial, Settings → Holidays lists the days your organization is closed. A new organization starts with this year's and next year's US federal holidays. Add your own with New holiday, and Delete those you work. A holiday comes off the weekly target of everyone with Paid holidays on, and is marked on their week. See Holidays.
Expense categories
Nobody can claim an expense until there is a category to claim it under, and a new organization has none. Under Settings → Expense categories, choose New category for each (Travel, Meals, Software…), and say whether it is Billable to the client by default. The Receipts card below sets the amount above which a receipt is required. See Expense categories, and Expenses and reimbursements for what people do with them.
Activities
An activity is the kind of work, such as development or meetings. A new organization has one, Project work, and doesn't ask for activities, so every line is booked on it; the setup wizard's third step turns them on or renames it. Add others under Settings → Activities with New activity, and set Billing treatment to Non-billable on the ones whose hours are never billed. See Activities.
Branding and email
On Settings → Organization:
- Language, on the General card beside the name, is what Clock Clerk speaks to everyone who has not chosen their own.
- Automated email, on the Notifications card, switches the scheduled timesheet reminders and weekly digests off, or back on, for everybody. They go out on the Team and Enterprise plans and during the trial.
- The Branding card puts your logo and brand color in the app's sidebar (the top bar on a phone), on your sign-in page, on invoices and in the email your organization sends. It is on the Team and Enterprise plans and during the trial; on Free and Starter the card says which plan adds it.
See Organization.
The trial and your plan
The trial has everything on the Team plan, with no limit on people, projects or clients, except threads shared with your clients and their guests, which come with any paid plan. Administrators see how many days are left at the top of every page, with See plans, and are emailed a week, three days and a day before it ends, and on the last day itself.
- Choose See plans. The Plans page shows each plan, marks the one that Fits your size, and grays out any you have outgrown.
- Choose Choose Starter or Choose Team. Where your deployment takes payment online, type a card and choose Subscribe; you are billed monthly for the people who enter time. Elsewhere, Send to support asks for the plan, and support applies it.
Not ready yet? In the trial's last seven days, or after it has ended, Ask for … more days on the Plans page extends it, once. Plans and your trial lists what each plan includes.
When the trial ends
If no plan is chosen, nothing is deleted, but the organization becomes read-only for everybody. Every page says Your free trial has ended.
- Still possible: signing in, reading every screen, reports and their exports (but not the export to an ERP), your own profile settings, and suggesting features. Administrators can still choose a plan, pay, and take the one extension.
- Refused: anything that adds or changes something, such as hours, approvals, people, clients and projects. Many buttons turn off; any other is refused when pressed, and the first refusal says Clock Clerk is read-only for your organization until a plan is chosen. Everything already recorded is still here and can still be read, reported on and exported. After that, the notice at the top carries the message.
- The scheduled reminders stop.
Each way out opens the organization again with everything as it was, but not all at once:
- The extension opens it straight away.
- Paying by card, with Subscribe, opens it once the payment is confirmed; the Plans page says Confirming your payment… until then.
- Send to support changes nothing until support applies the plan.
Checklist
Once you have been through steps 1 to 9, your team is ready to record time:
- Everyone is on People, with the right role and start date, and has their invitation, or signs in with Microsoft.
- There is a client, with a project that has at least one task.
- Everyone who works on the project is ticked on its team, with a billing role turned on.
- Each manager has Manager access to the clients or projects whose time they approve.
Your people then follow Record and submit your week, and their managers Review and approve time.
When something goes wrong
- During the trial, invitations are only emailed to addresses at … Use Copy invitation and send … the link yourself. The person was added; send their link from Copy invitation on their page.
- During the trial, invitations are only emailed to the domain this organization signed up with, and it has none on record. Use Copy invitation instead. or During the trial, invitations are only emailed by an administrator who is a member of this organization’s directory. Use Copy invitation instead. Clock Clerk cannot tell what your own domain is. Copy the link instead.
- Invitations from this organization are limited to 5 a minute and 50 a day. Wait a moment, or use Copy invitation. Wait, or copy the link.
- … is already in Clock Clerk. or … is already in Clock Clerk at … The person, or their email address, has been added before. Open them from the People list.
- … is already a guest at … Convert the guest as you add them, so their messages stay theirs. The address belongs to a client guest. The dialog offers Convert guest instead of Add person.
- The Free plan is for up to 3 people, and your organization has 3. Move to the Team plan to add anybody else, or set an end date on somebody who has left. Free plan limits. Clients and projects have similar messages: … Archive one to make room, or move to the Team plan. and … Mark one Complete to make room, or move to the Team plan. Choose a plan, or make room.
- You cannot give up your own administrator role. Ask another administrator. Make someone else an administrator first, and have them change your role.
- You do not manage this client. A manager can add projects only to a client they have Manager access to, not just to one of its projects.
- A person cannot see the project on their week. They are not ticked on its team, or the client is archived. If they see it but cannot book to it, they have no billing role on it, or it has no task they can see.
- A manager has nothing in Approvals. Their role is not Manager, they have no Manager access to the project, or nobody is on its team. See step 9.
- Colleagues signing in with Microsoft are told no organization signs in with their account yet, or that their organization is not set up yet. Nobody has set your Microsoft directory up: start the trial with Continue with Microsoft, or have a Microsoft Entra administrator grant consent, as in step 1.
- Holidays or Integrations are missing, or Branding offers only Move to the Team plan. Your plan does not include them; see Plans and your trial. Integrations is where an administrator connects the tools tasks are imported from.