Workflows
Record and submit your week
Each week you book your hours against the tasks you worked on, one line per task, and submit the week when it is complete. It takes a few minutes, and most of it can be done from the keyboard.
Who does this
Everyone who signs in to the organization: User, Manager, Finance and Admin alike (see Roles). Client guests do not record time.
- You can only book time to a project whose team you are on. An administrator, or whoever runs the project, adds you to its team; until then, adding a line says You’re not on any project yet.
- You also need a billing role on the project. Without one, its tasks stay closed and the app says You have no billing role on … Ask whoever runs it to assign you one, and its tasks open up here.
- If you are a contractor, you record your weeks the same way. At the end of the month you also submit the month on My Month, which submits any weeks still open.
Your profile sets a few defaults for this page under Timesheet defaults: Default billing role, Default activity, Daily target hours, Show hours as (decimal or hours and minutes) and Hours per scroll notch.
1. Open your week
- Choose My Week in the menu. It opens on the current week, Monday to Sunday.
- To reach another week, use the ‹ and › buttons, choose the week's dates to pick one from a calendar, or choose This week to come back.
The bar at the top shows the week's hours against its target, the week's status (Draft — not submitted until you submit it), and the buttons for the week. The My Week reference page describes every part of the screen.
2. Add a line
A line is one task booked under one billing role and one activity. Add one for each task you worked on. Your organization, or a project, may not ask for an activity: then you pick only the task and the billing role, and the line is booked on your organization's default activity without you choosing it (see Activities).
- Choose Add line in the top bar, or + Add line under the last line. Hovering over a client's name offers + Add project, and hovering over a project offers + Add task, which open the same dialog with the client or project already chosen.
- In the New line dialog, pick the Client, then the Project, then the Task. Type in the search box to narrow a long list. A client or task already on your week is marked on week, and a finished task is marked Done: you can still book time to it.
- Check the Billing role and, where the project asks for one, the Activity. They start at your profile's defaults where you have set them, and the dialog says which is a default. On a project that doesn't ask, the dialog has no Activity step.
- Choose Add to week. The dialog stays open, so you can add the next line straight away. Choose Close when you are done.
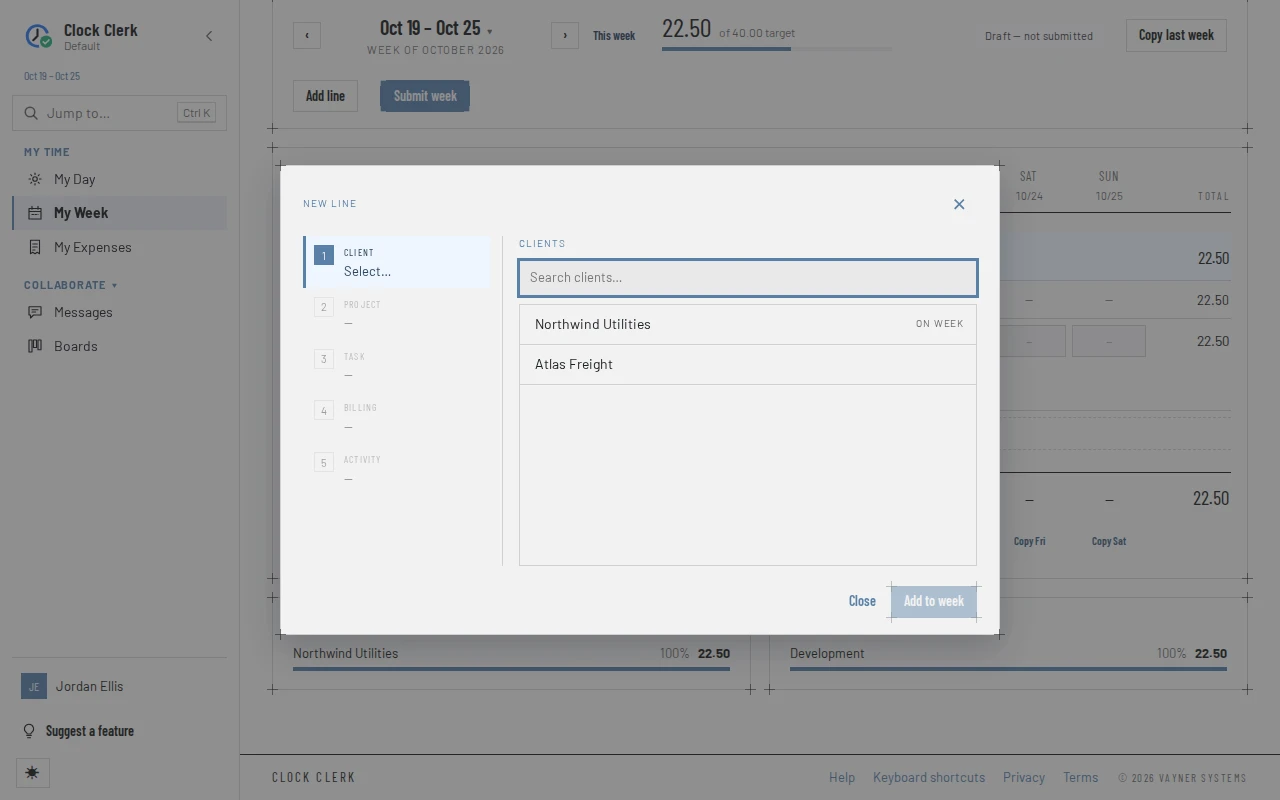
Two shortcuts save adding lines one by one:
- Copy last week adds the lines from last week that are not on this week yet. It copies the lines, not their hours. The message that confirms it has an Undo button.
- Duplicate line, in a line's ⋯ menu, adds the same task again so you can book part of the time under another billing role or, where the project asks for one, another activity.
If you turn on Start each new week with last week's lines (no hours) under Timesheet defaults on your profile, a new week starts with its lines already there. The first time you open an empty week, on this page or a day's page, it fills with the lines of your most recent week that has any, from up to four weeks back, without their hours, and a message says how many lines it added. Its Undo button removes the ones you haven't entered hours or comments on since. A week you have cleared, or one that already has lines, is left as it is. Add line and Copy last week work as before.
To change a line's task within the same project, pick another task in the line itself. To change its billing role or activity, choose the role or the activity shown under the task. A line whose project doesn't ask for an activity shows none. To book it to another project, move it.
3. Enter your hours
- Choose a day's box on the line and type the hours. Clicking into a box that already has hours selects them, so what you type replaces them; click again to place the cursor inside. You can write them as
6,6.5,6:30,1h30mor90m. - Press Enter or Tab, or click elsewhere. Each entry is saved as you go; there is no Save button. Saving… shows in the top bar while it is being written.
Opening a day also opens a panel under the line with the day's details:
- Hours, with buttons that add + 15m to + 4h, or take off − 15m.
- Comment, for what you did that day.
- The line's Billing role and, where its project asks for one, its Activity. Changing either changes the whole line, not just the day.
- The day's total against your daily target, Clear day, which removes the day's hours and comment and offers Undo for a few seconds, and Done, which closes the panel.
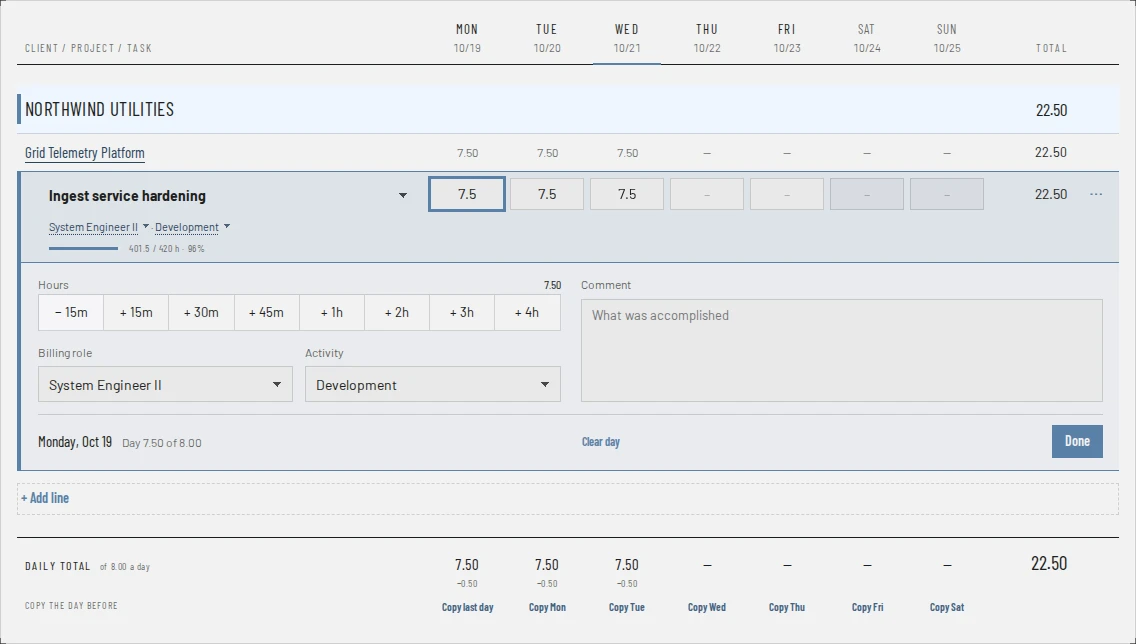
To fill a day like the one before it, use the Copy the day before row under the totals. Its button under each day (Copy Mon, Copy Tue, and so on) copies the previous day's hours and comments onto every line that has nothing on that day yet. Under the week's first day it reads Copy last day and copies the last day you logged anything. You can also scroll the mouse wheel over a day you are typing in to add or take off time, a quarter of an hour per notch unless your profile says otherwise.
A day holds at most 24 hours across all your lines. Hours on a holiday or a weekend are allowed and counted.
4. Comment on a day
A comment says what you did that day, and stays with that day's hours.
- Open the day on the line and type in Comment. Pressing Enter in a day's hours takes you there directly.
- Press Ctrl + Enter (⌘ + Enter on a Mac), or choose Done. The comment is saved with the day.
A comment is saved with the day's hours. Typed on a day that has no hours yet, it waits in the box under Saved when you enter hours and is saved as soon as you enter some. Leave the week before then and it is not kept.
A day with a comment shows a small mark in its box, and hovering over the box shows the comment. On a submitted week you can still open a day to read its comment and copy it with Copy comment, though not change it.
If you would rather work a day at a time, My Day shows the same lines for one date, with the comment beside each task. It is the same timesheet: what you enter on one shows on the other.
5. Check the totals
- The top bar shows the week's hours against its target, for example 22.50 of 40.00 target. The target is your Daily target hours times the week's working days.
- The Daily total row shows each day against the daily target, with how far under or over it is.
- Saturday and Sunday are not working days. A holiday on your organization's schedule is marked with its name above its day. If you are paid for holidays (the default for employees, set by an administrator), a full holiday counts as no working day and a half day as half a day, so the target drops with it. Holidays need a paid plan.
- Where some of the week is not billed to the client, the bar also splits the total into billable and non-billable hours, and lines that are not billed say Not billed to client.
- A task with an estimate shows a bar under its name with the hours everyone has logged against it.
6. Submit the week
- Choose Submit week.
- The Submit this week? dialog shows the week's hours against its target and says what will happen next. Check it and choose Submit week.
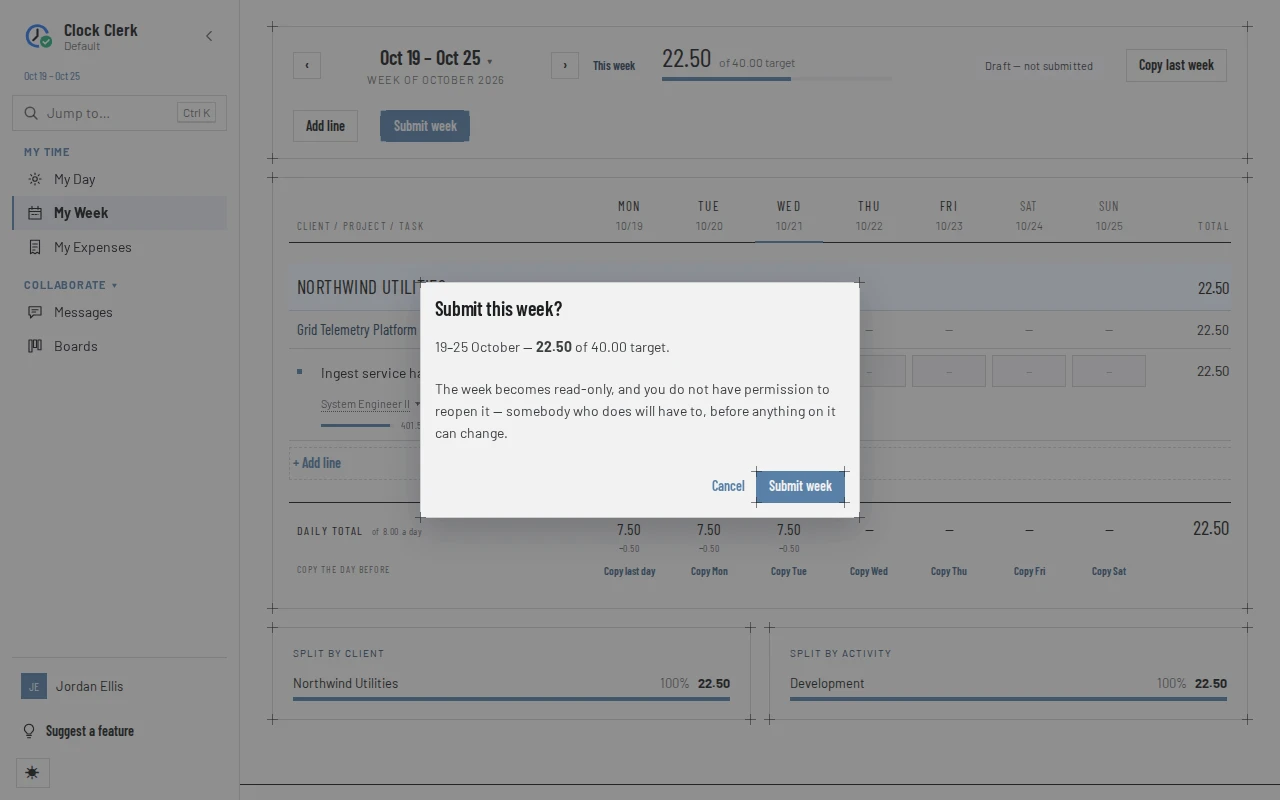
What happens next:
- The week's status becomes Submitted for approval, and the week becomes read-only.
- It appears in the Approvals queue of whoever reviews your time, who approves it or sends it back. That is covered in Review and approve time.
- The Submission history under the week records when you submitted it, and every reopening and send-back after that.
You can submit a week with no hours on it. That is how you tell your reviewer you did not work that week, for example while on leave. The dialog says No time is recorded on these days. Submitting says you did not work them; your reviewer approves that or sends it back.
Submit week waits while an entry is still being saved, so nothing you typed is lost.
Weeks that run into a new month
Time is submitted a month at a time, so a week that starts in one month and ends in the next is submitted in two parts, one per month. About eleven weeks a year are like this.
- The week sheet shows a band over the days, Filed a month at a time, with each month's hours, its own status and its own Submit or Reopen button.
- The top bar shows a short status per month (for example Sep · Draft), and its button reads Submit…. It opens a list of both months, each with a tick box. Both are ticked, so confirming submits the whole week. Untick a month to submit only the other one.
- Each month's days lock on their own. You can keep entering hours in the open month after submitting the other.
- Your reviewer approves or sends back each month separately.
Why a week cannot be edited
When a week, or some of its days, cannot be changed, the day boxes are shaded and Add line, Copy last week and the lines' ⋯ menus are gone or disabled. Hovering over a locked day says why in a few words (for example on invoice …), and the app's longer message, when you try to change it, is in the table. There are five reasons:
| Why | What the app tells you | How it opens again |
|---|---|---|
| Submitted | This week has been submitted for approval. Reopen it before changing anything on it. | Reopen it yourself, if you may, or ask your reviewer to send it back. |
| Approved | Approved by … on … — this week is closed. | A reviewer who can approve it (a manager over your projects, Finance or an administrator) reopens it. It goes back into their queue as submitted, not to draft, so you still cannot change it until they send it back. They cannot reopen it while its hours are on an invoice or a protocol. See Changing your mind. |
| Billed on an invoice | These hours are on invoice … Void it before changing them. | Someone in Finance or an administrator voids the invoice, discards the draft, or removes the hours' line from it. See Why billed hours are locked. |
| On a contractor's acceptance protocol | These hours are on acceptance protocol … Ask for it to be returned before changing them. Once the protocol is approved for payment or paid, the hours are final. | The protocol is withdrawn or returned, until it is approved for payment. See What the contractor lock freezes. |
| The organization is read-only | Clock Clerk is read-only for your organization until a plan is chosen. (or until the subscription is paid for again) | An administrator chooses a plan. Everything recorded can still be read and exported meanwhile. |
Locks follow the days, not the week. On a week that runs into a new month, one month can be locked while the other is still open. And it is the hours that decide: a line whose days are all in the open part of the week can still be changed, moved or removed.
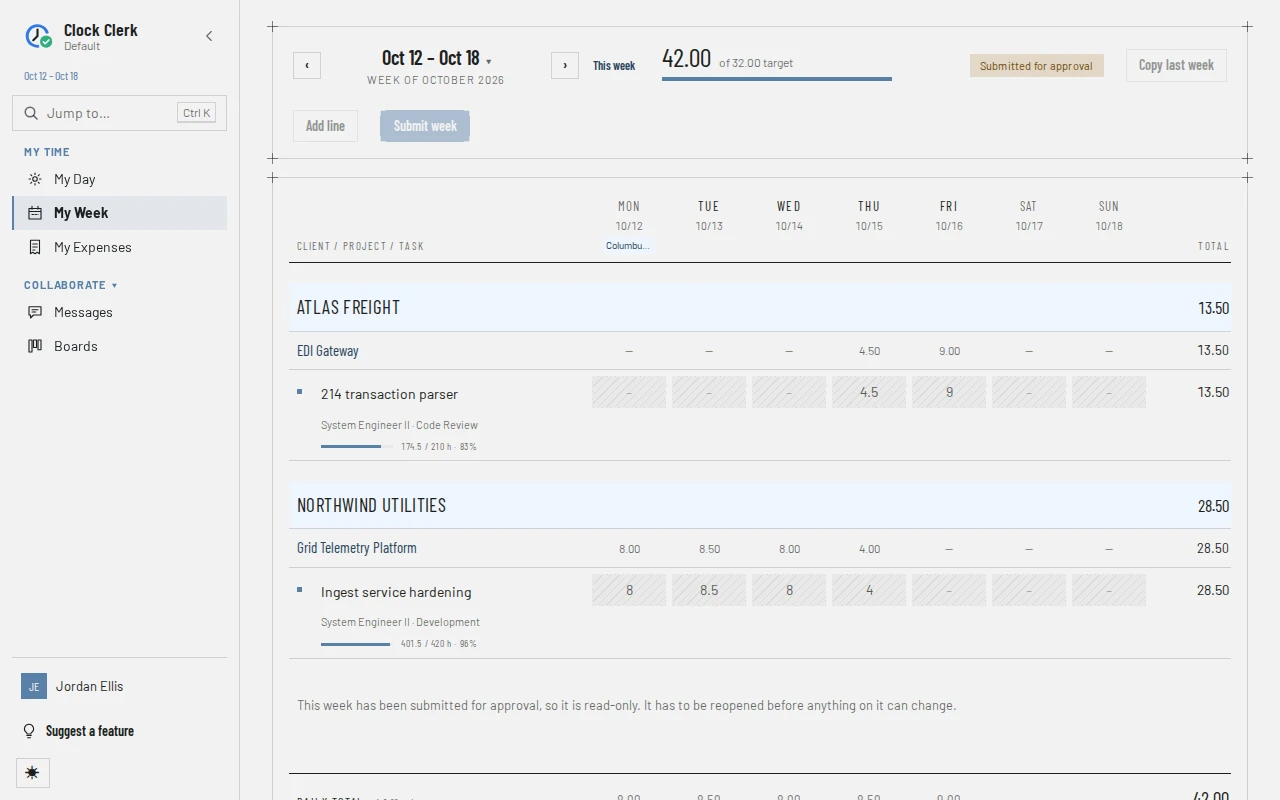
Reopening a week yourself
You can take back a week you submitted, change it and submit it again, but only when all of these are true:
- You have the Can reopen a submitted week permission. It is on by default for everyone added to the organization; an administrator can turn it off for you on your page under Settings → People.
- The week has not been approved yet.
- None of its hours or expenses are on an invoice or a contractor's acceptance protocol.
Without the permission, or once the week is approved, there is no Reopen week button; the submit dialog warns you before you submit if you do not have the permission. If the week's hours or expenses are on an invoice or a protocol, the button is there but the app refuses, with one of the messages below. Either way, ask the person who reviews your time to send the week back instead.
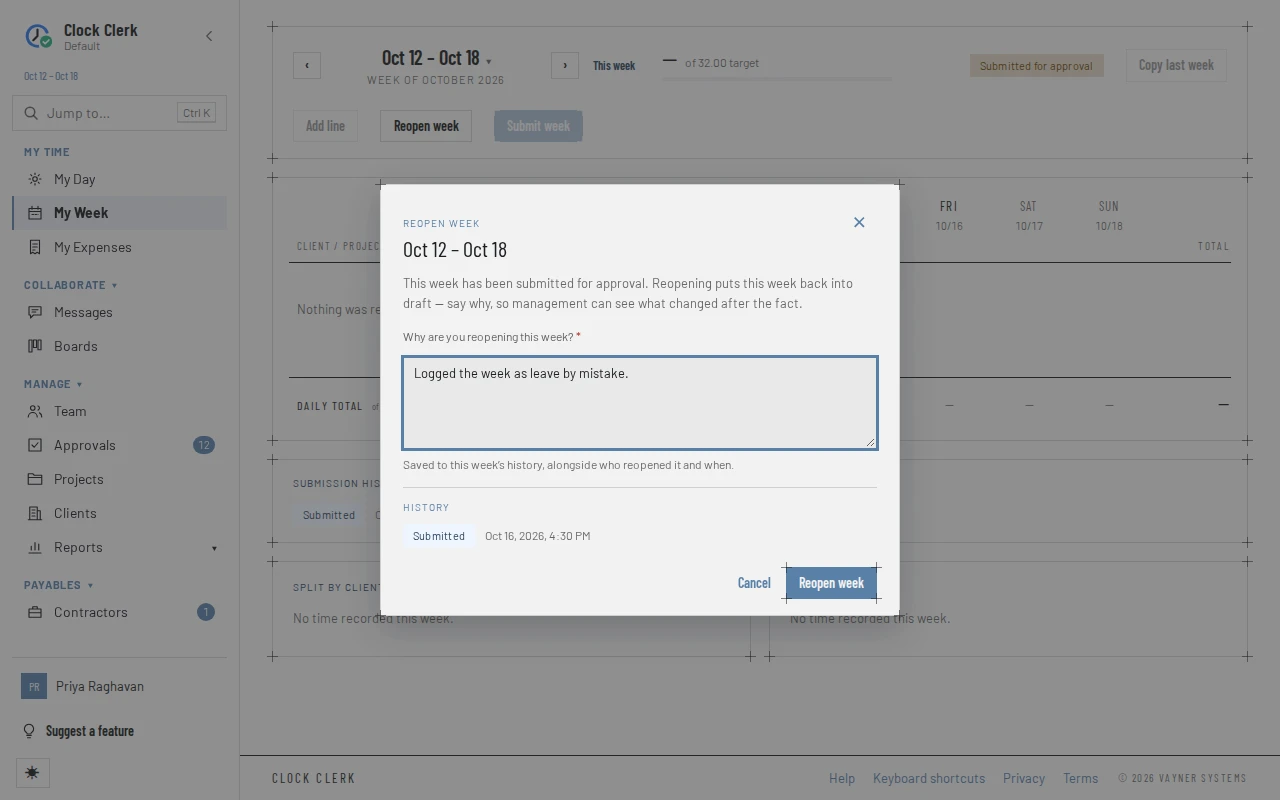
- Open the week and choose Reopen week. On a week that runs into a new month, use the Reopen button on the month's band instead.
- Under Why are you reopening this week?, say what you need to change. The reason is required, up to 1,000 characters.
- Choose Reopen week. The week is back in Draft — not submitted, and your reason is kept on its submission history with who reopened it and when.
- Make your changes and choose Submit week again.
If the app refuses, it says why:
- You are not allowed to reopen a submitted week. Ask an administrator.
- This week has been approved. Ask your manager to reopen it.
- This week has hours or expenses on invoice … Void the invoice first — reopening it afterwards is the right order.
- This week has hours on acceptance protocol … Withdraw or return the protocol first — reopening it afterwards is the right order.
- This week has hours on acceptance protocol …, which has been approved for payment. They are final. (or …which has been paid). Such a week cannot be reopened.
- Say why you are reopening this week — the comment is kept on the week's history.
A week sent back to you
Your reviewer can send a submitted week back with a reason. Sending back is the reviewer's decision; you cannot send back your own week, whatever your role.
- The week opens again, and its status becomes Sent back for changes.
- A notice above the week says Sent back by …, quotes the reason, and asks you to make the changes and submit the week again. If your organization sends email, you are emailed the reason too.
- On a week that runs into a new month, only the month that was sent back opens, and the notice names it.
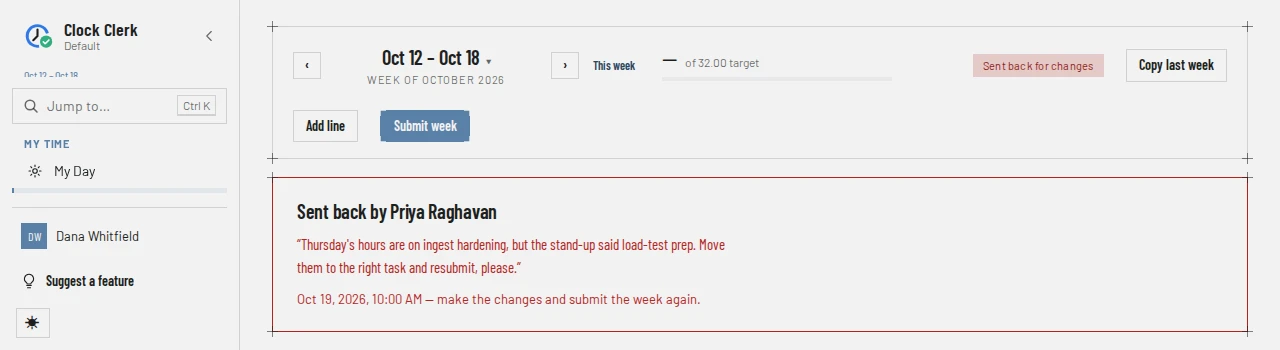
Make the changes, then choose Submit week. Submitting again clears the notice, and the week goes back into your reviewer's queue. The send-back and its reason stay on the week's submission history.
Moving a line to another project
If you booked hours to the wrong project, move the line rather than retyping it. Its hours, comments, billing role and activity all go with it, so the week's total stays the same. Moved to a project that doesn't ask for an activity, the line is booked on your organization's default activity instead, and the panel doesn't mention one.
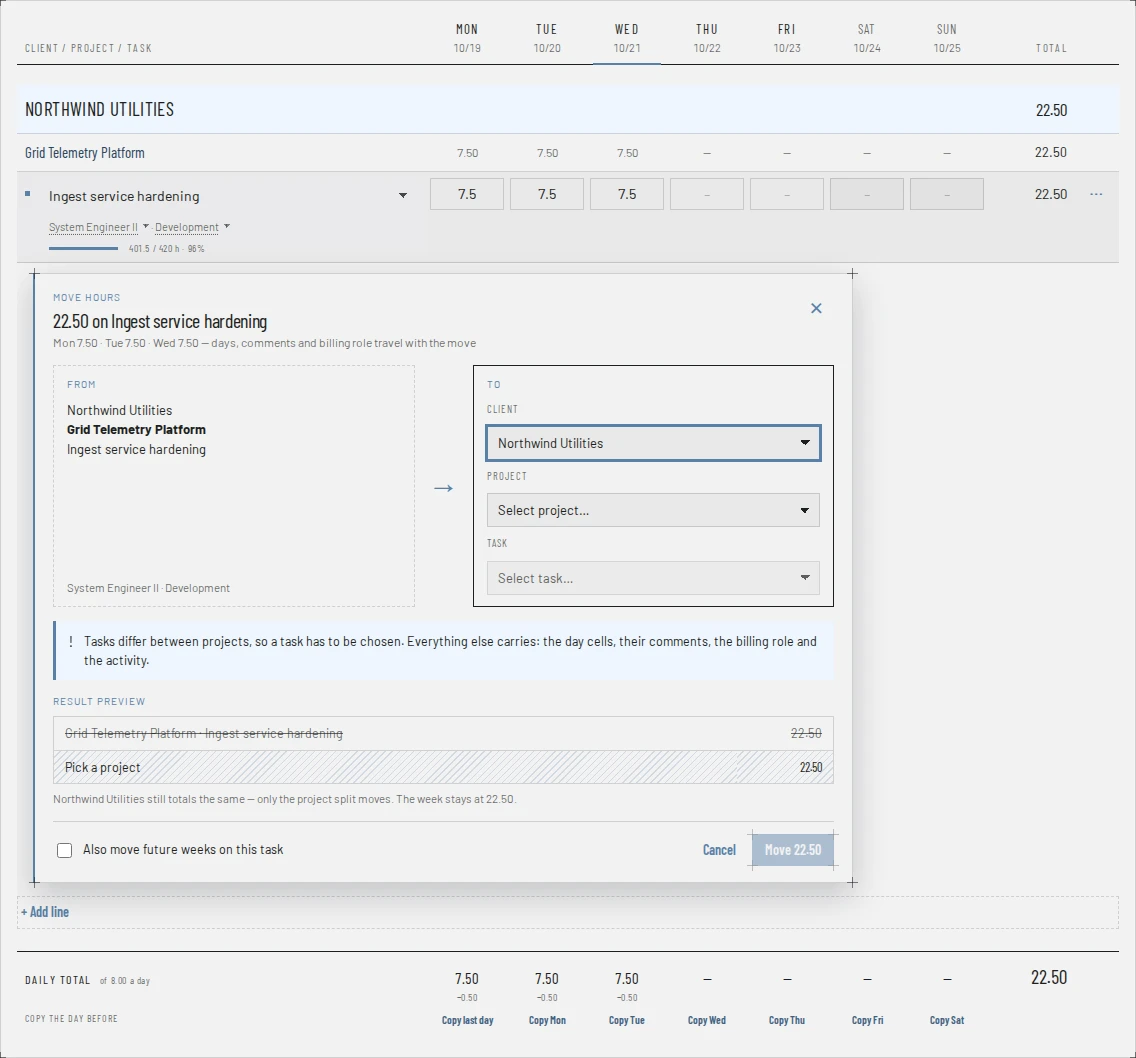
- Open the line's ⋯ menu, at the end of the line, and choose Move to another project….
- Under To, pick the Client, Project and Task. If the new project has a task with the same name, it is picked for you.
- Check the Result preview. If your week already has that task with the same billing role and activity, the two lines become one and their hours add up; the panel says so.
- Tick Also move future weeks on this task to move the same booking on your later weeks too. Weeks already submitted are left alone.
- Choose the Move button, which names the hours it moves (for example Move 22.50).
A line with hours on submitted days cannot be moved until the week is reopened, and a line with hours on an invoice or a contractor's protocol cannot be moved at all until the invoice is voided or the protocol is withdrawn or returned. Hours on a protocol approved for payment or paid are final and never move.
Removing a line
Open the line's ⋯ menu and choose Remove line…. The Remove line? dialog warns that the line and all hours logged against it this week will be removed, and that this can't be undone. Choose Remove line to confirm. To clear just one day, open the day and choose Clear day.
Using the keyboard
The arrow keys move between days and lines, Enter saves the hours and goes to the day's comment, Alt + Enter opens the comment, and Esc closes the open day. Ctrl + K jumps to any page. The full list is on Keyboard shortcuts.
When something goes wrong
- “…” is not a time. Try 6, 6.5, 6:30 or 1h30m. The hours were typed in a form the sheet does not read. The day keeps what it had.
- A day cannot hold more than 24 hours, and … is already booked on this one. Your lines add up to more than a day. Check the other lines on that day.
- This week already carries that task on the same billing role and activity. Put the hours on the line that is already there. A week has one line per task, billing role and activity.
- Your organization has no default activity, so time on a project that doesn't ask for one has nowhere to go. Ask an administrator to add an activity under Activities. Your organization has no active, billable activity to be the default. See the message's entry.
- That billing role is not assigned to you on this project. Pick one of your roles, or ask whoever runs the project to assign you this one.
- Attach the receipt for this expense before submitting: … or Attach the missing receipts before submitting (…): … An expense dated in the week needs its receipt before the week can be submitted. Add it under My Expenses; the top bar shows Receipt needed beside the week's expenses.
- A project is missing from the New line dialog. You are not on its team. Ask an administrator, or whoever runs the project, to add you.
- There is no Reopen week button. See Reopening a week yourself for who may reopen, and until when.